Table of Contents
Using fork-and-pull
Autoware.Auto follows the fork-and-pull model of Git use. This means that developers should make a fork of the Autoware.Auto repository, develop in branches on that fork, and then make merge requests (the GitLab term; pull requests in GitHub terminology) from that fork to the central Autoware.Auto repository.
The basic flow consists of the following steps.
- If one does not exist already, create an issue in the Autoware.Auto repository to track goals and progress. See the GitLab documentation for more information on how to create an issue.
Make a fork of the Autoware.Auto repository. The Autoware.Auto repository is known as the upstream repository relative to your fork. You will need a GitLab account for this, but a free account is sufficient. This fork will initially be stored on the GitLab servers only.
To make a fork, click the "fork" button in the top-right corner of the Autoware.Auto "Project overview" screen.
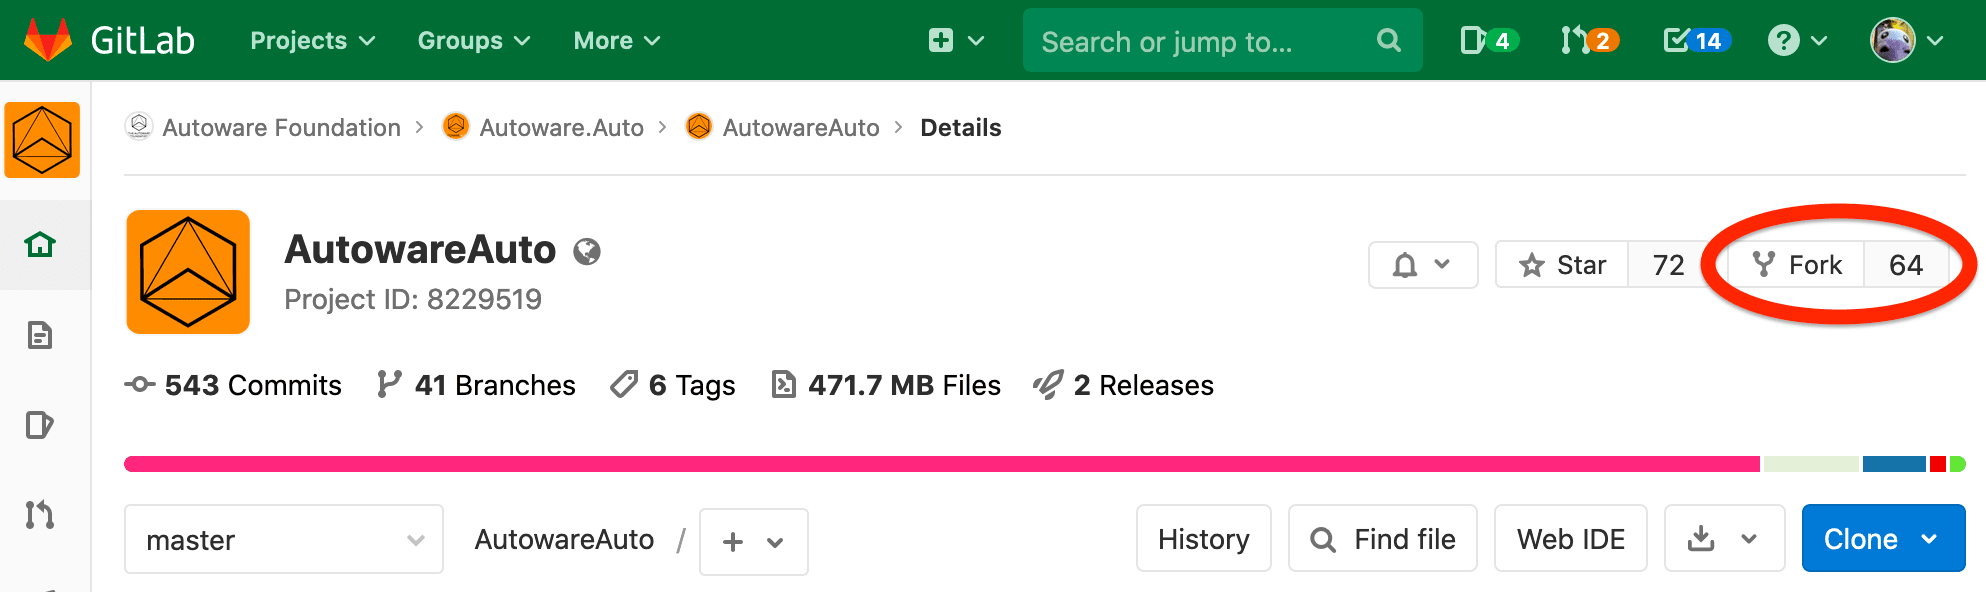 Location of the fork button
Clone your fork locally to create a local copy.
$ git clone git@gitlab.com:[your_username_here]/AutowareAuto.git
You can find the URL for cloning your fork by clicking the "Clone" button in the "Project overview" screen or "Repository - Files" screen of your fork.
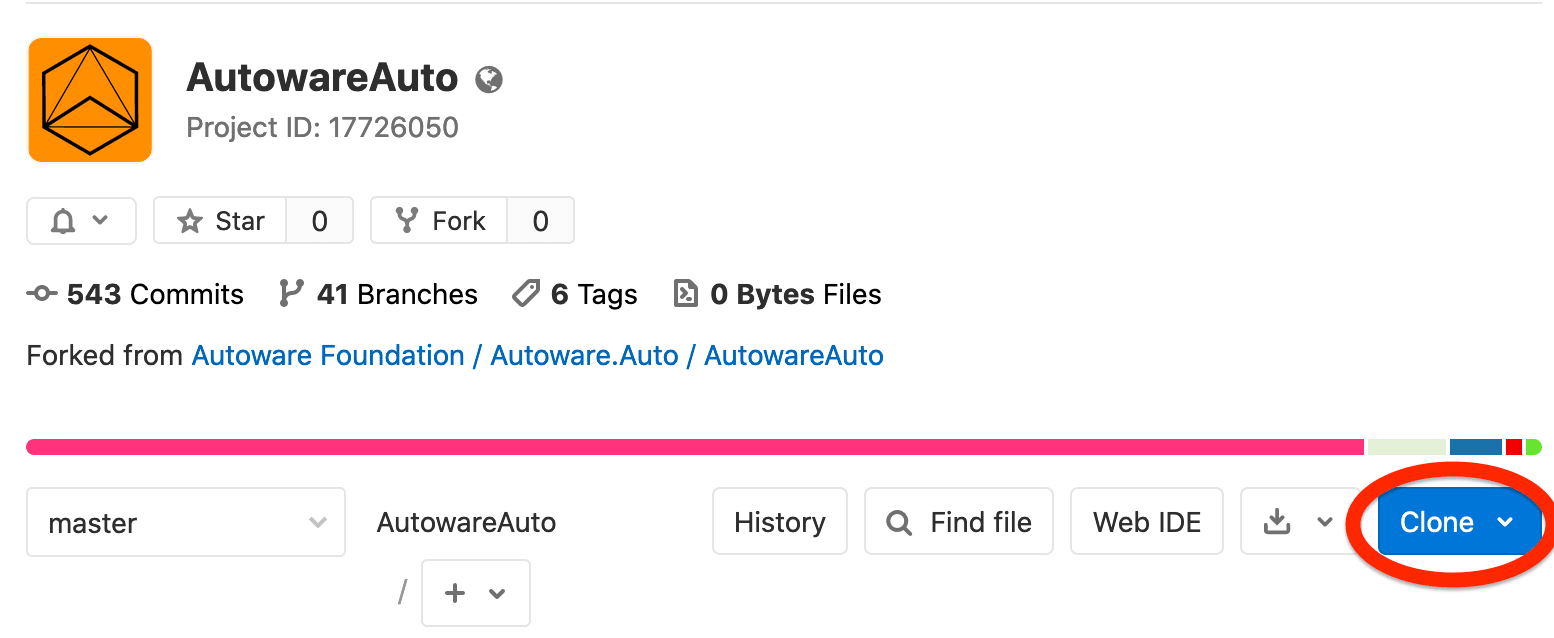 Location of the Clone button
In your local copy, create a new branch to do your work in. Give the branch a descriptive name. GitLab uses the pattern
[issuenumber]-[issue-name-with-hyphens]. For example, if you are doing work for issue #42, "Calculate the answer to the ultimate question", you could name your branch like so:$ git checkout -b 42-calculate-the-answer-to-the-ultimate-question
This will create a new branch and put your local working copy into it. It is important to note that this new branch is still only stored on your computer. Before you can create a merge request, it must be pushed to the copy of your fork on the GitLab server.
- Do your work in your local copy, in the new branch. Be sure to pay attention to the contribution guide for how to write your code, etc.
- Commit your changes to the branch in your local copy.
Now that you have changes in your local copy, it is time to get them to the server, from where you can create a merge request. From this point is where you need to be careful about where you run commands to ensure you do not accidentally pollute your history. If your history is not clean and up-to-date, your merge request will not be able to be merged.
Begin by adding the upstream repository location to your local repository's settings as a remote repository. You only need to do this the first time.
$ git remote add upstream https://gitlab.com/autowarefoundation/autoware.auto/AutowareAuto.git
Now that the upstream repository location is set, bring your branch up-to-date with the upstream repository's master branch.
$ git checkout master
$ git fetch upstream
$ git merge upstream/master
The final command updates the
masterbranch of your local copy to match themasterbranch of the Autoware.Auto repository. It is very important to use thegit mergecommand to do this. Do not use thegit rebasecommand to bring your local copy'smasterbranch up-to-date. The reason for this is that you should never rebase commits that are public, and all the commits in themasterbranch are by their nature public.If the final command above does not happen smoothly, then your local copy of the
masterbranch, or possibly the copy of themasterbranch in your fork on the server, has become polluted with extra commits. See the troubleshooting section at the end of this document for a solution.- The
masterbranch in your local copy now matches themasterbranch in the Autoware.Auto repository. To ensure that your branch will apply cleanly to themasterbranch on the Autoware.Auto repository, which is a prerequisite for making a merge request, you need to bring the recent changes from themasterbranch into the branch containing your work. This is done using thegit rebasecommand. You will be rebasing your changes onto the latest commit in themasterbranch.$ git checkout 42-calculate-the-answer-to-the-ultimate-question $ git rebase master
Finally, push your changes to the copy of your fork on the GitLab server.
If this is the first time you are pushing this branch, you need to tell Git where the branch on your fork (not the Autoware.Auto repository) is.
$ git push --set-upstream origin 42-calculate-the-answer-to-the-ultimate-question
If you have pushed this branch before, then you do not need to set the destination branch, but you do need to do a force-push.
$ git push -f
You now have a copy of your branch with your proposed changes in your fork on the GitLab servers. If you are ready for this work to be merged into the Autoware.Auto repository's
masterbranch, you must now create a merge request.Create a merge request to merge your changes into the primary fork.
When you perform the
git pushcommand, above, for the first time, the result from the GitLab server will contain a URL that you can use to create a merge request from your branch.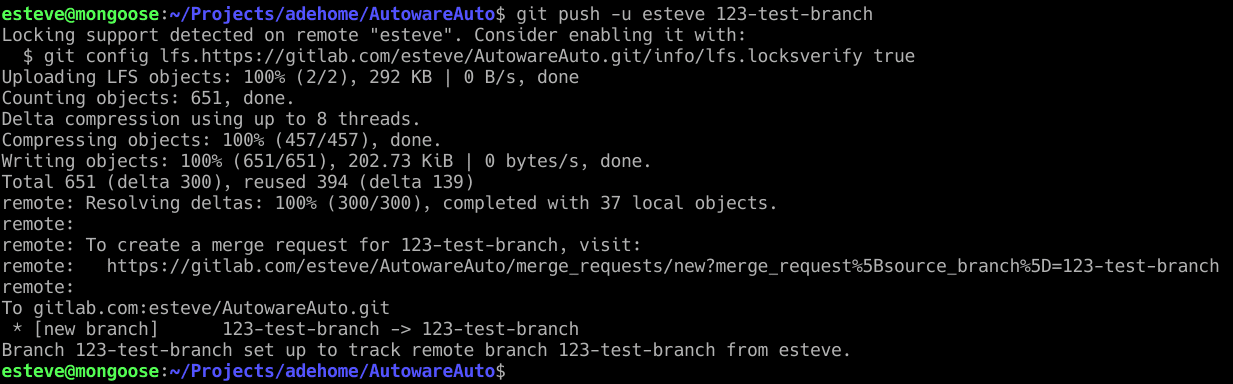 URL to create a merge request directly
Alternatively, you can create a merge request through the GitLab website. On the Autoware.Auto project page, and on the page for your fork, there will be a button to create a merge request.
 Button to create a merge request
If your merge request closes the issue you created in the first step above, its description should contain the words "Closes #<issue_number>". See the Gitlab documentation for more details.
If your merge request isn't quite ready for review:
- Add "WIP: " to the beginning of your merge request's title and it will automatically be marked as Work in Progress.
- Remove "WIP: " when your merge request is ready for review. See the next step for how to let a maintainer know that it is ready.
- WIP merge requests can not be merged.
When your merge request is ready for review:
- Assign it to a maintainer and add the "review" label.
- If you do not have permissions to change milestones or labels on your merge request or are not sure who should review your request, mention a maintainer in the comments for assignment.
During the review process, you may need to make additional changes in response to comments from reviewers, so you must watch your merge request and respond to comments as soon as possible. When you push your changes, the merge request will be updated automatically and the Continuous Integration system will also be run. If this detects any problems (such as compilation or test failures), you must also fix these.
When you need to add additional changes to the branch (for example, in response to a comment during code review), you will need to repeat the git push -f step above. If there have been other merge requests merged into the master branch since you last pushed, you will also need to repeat the merging into master and rebasing steps. When it is required and can be done automatically by GitLab, a "Rebase" button will be available on your merge request. Click the button to perform the rebase and start the CI jobs again. When it cannot be performed automatically due to conflicts between your proposed changes and the source code in the master branch, you will need to fix these conflicts in your fork before the merge request can be accepted.
Working with changes from other merge requests
There are times when you are working on something in your branch, and you find that you need to include some work that is not yet merged but is available in a separate merge request. It is possible to temporarily include this work in your own branch while you develop, without polluting the history of changes that eventually make up your merge request.
Note that doing this places the following restrictions on your own merge request.
- Your merge request cannot be reviewed until the other merge request(s) you depend on has been merged into
masteron the Autoware.Auto repository first. You should mark the issue that gave rise to your merge request as blocked by the relevant other issues. You must rebase and ensure a clean history, containing only your changes, prior to making a merge request. If you follow the instructions here to rebase your branch before making a merge request then this should not be a problem.
To include the changes from another merge request in your own branch, prior to them being merged into the
masterbranch, you need to get that branch into your local copy and merge it into your branch.- In your local copy, fetch the latest from the upstream repository.
$ git fetch
- Change to your branch and merge in the changes from the branch for the merge request you wish to use.
$ git checkout 42-calculate-the-answer-to-the-ultimate-question
$ git merge upstream/41-calculate-the-ultimate-question
- Follow the above steps for how to rebase your branch when the branch you depend on has been merged and your branch is ready to be merged into
master.
When to do multiple merge requests
Sometimes while developing a new feature, you may find a bug that needs fixing. There may be cases of this where you cannot continue development of your feature until the bug is fixed.
In this situation, the correct thing to do is to first file a bug report, then create a new merge request containing the fix. However, the source of that merge request should not be your branch for your new feature. You should create a new, separate branch for the bug fix and follow the standard process to create a merge request and get the bug fix merged into the master branch on the Autoware.Auto repository.
To use the bug fix in the branch for your new feature prior to it being merged into master, you can follow the above steps for working with changes from other merge requests.
What to do when updating master doesn't work
If the command to update your local copy of the master branch to the Autoware.Auto repository's copy (the git merge upstream/master command) does not go smoothly, then your local copy of the master branch, or possibly the copy of the master branch in your fork on the server, has become polluted with extra commits. You can fix this situation and bring your local copy back into line with the remote copy by moving the changes to a branch.
Create a new branch from master, then reset master to match the upstream.