Table of Contents
Goals
This article motivates developers to test code, explains the importance of testing, and details the testing performed in Autoware.Auto.
Furthermore, this article details how to write unit tests, how to run unit tests, and how to track code test coverage.
Quick reference
- colcon is the tool of choice for building and running tests
- ament_cmake is useful to specify tests in CMake
- Chris Hobbs' Embedded Software Development for Safety Critical Systems, describes tests necessary for code running in safety critical environments
- ISO 26262 standard part 6 prescribes how to test code in automotive systems
- SQLite is a software project that has an impressive and thoroughly described testing system
Importance of testing
Dynamic and static testing methods make Autoware.Auto reliable and robust, helping us to perform anomaly detection and handling that would otherwise be difficult to find. Through testing in Autoware.Auto, we can estimate the number of Heisenbugs, and find and eliminate undefined behaviours for which C and C++ languages are known.
Dynamic analysis, simply called “testing” as a rule, means executing the code while looking for errors and failures.
Static analysis means inspecting the code to look for faults. Static analysis is using a program (instead of a human) to inspect the code for faults.
There are also formal verification methods (see the book, Chapter 15); note that the topics will not be covered in this document.
Testing in Autoware.Auto
This section introduces various types of tests that are run both manually and automatically.
Style / linter tests
Some examples of tools used for style and linting are cpplint, uncrustify.
Tests using the tools above allow Autoware.Auto to follow C and C++ style guides which results in uniform, easy to read code.
Static code analysis
The Cppcheck tool is used for applications written in Autoware.Auto.
Static code analysis tools detect the following types of errors:
- API usage errors
- Best practice coding errors
- Buffer overflows
- Build system issues
- Class hierarchy inconsistencies
- Code maintainability issues
- Concurrent data access violations
- Control flow issues
- Cross-site request forgery (CSRF)
- Cross-site scripting (XSS)
- Deadlocks
- Error handling issues
- Hard-coded credentials
- Incorrect expression
- Insecure data handling
- Integer handling issues
- Integer overflows
- Memory—corruptions
- Memory—illegal accesses
- Null pointer dereferences
- Path manipulation
- Performance inefficiencies
- Program hangs
- Race conditions
- Resource leaks
- Rule violations
- Security best practices violations
- Security misconfigurations
- SQL injection
- Uninitialized members
Unit tests
Unit testing is a software testing method by which individual units of source code are tested to determine whether they are fit for use.
The tool used for unit testing is gtest. A full working example is provided below.
Integration tests
In integration testing, the individual software modules are combined and tested as a group. Integration testing occurs after unit testing.
Since integration testing greatly depends on the system architecture, Autoware.Auto provides an integration testing tool called integration_tests.
While performing integration testing, the following subtypes of tests are written:
- Fault injection testing
- Back-to-back comparison between a model and code
- Requirements-based testing
- Anomaly detection during integration testing
- Random input testing
Memory tests
Memory tests allow the detection of unwanted calls to memory management APIs, such as:
malloccallocreallocfree
For more details on memory tests see the memory testing tool.
Software and Hardware-In-Loop tests
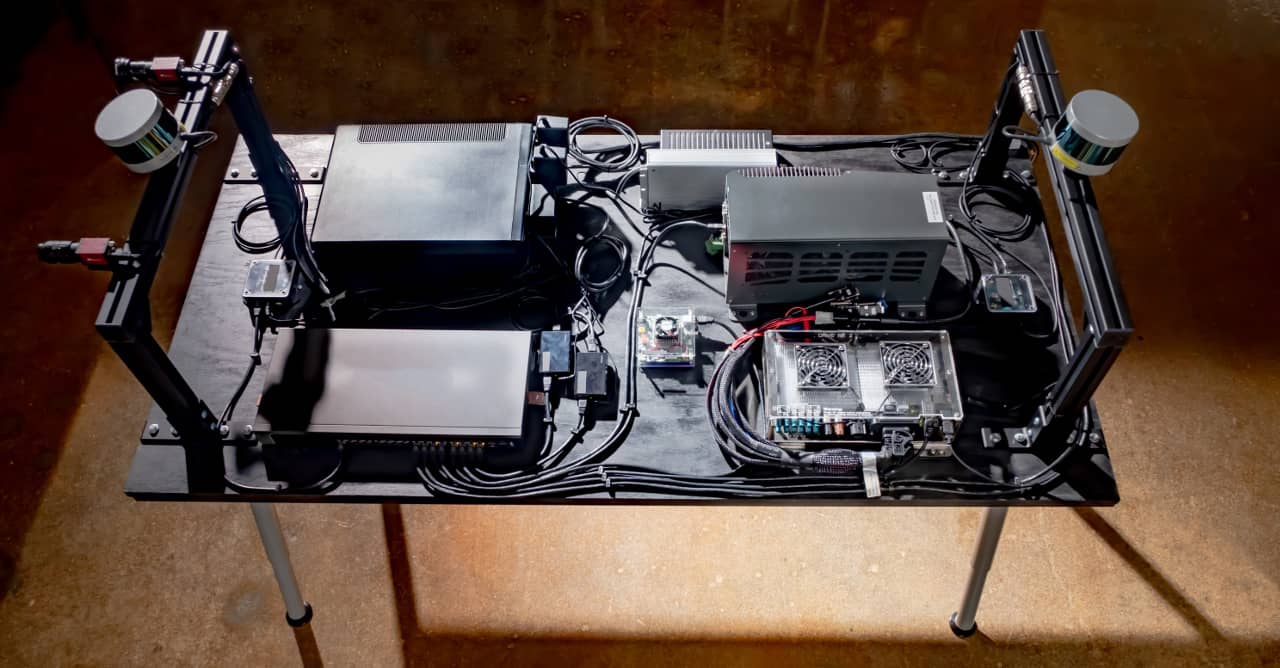
With software in the loop (SIL) and hardware in the loop (HIL) testing the integration of Autoware.Auto with real sensors and ECUs is proven, as shown in the image below.
These types of tests assure that Autoware.Auto remains compatible with sensor interfaces and specific firmware versions, for example:
Road tests
Tests are written for Autoware.Auto applications, which are deployed and tested on the autonomous vehicles.
These road tests validate Autoware.Auto in a realistic autonomous vehicle product. Along with road tests, Autoware.Auto also performs integration testing with the research-focused counter-part Autoware.

Write, build, run, and analyze unit tests
Autoware.Auto uses the ament_cmake framework to write, build, and run tests. The same framework is also used to analyze the test results.
ament_cmake provides several convenience functions to make it easier to write CMake-based packages:
- Generate a CMake configuration file for the package, which allows for passing information (e.g. about include directories and libraries) to downstream packages
- This feature makes it easy to pass along information from recursive dependencies (and takes care of ordering include directories)
- Easy interface to register tests and ensure that JUnit-compatible result files are generated
- Currently supports a few different testing frameworks like
pytest,gtest, andgmock
- Currently supports a few different testing frameworks like
- Allows a package to generate environment hooks to extend the environment, for example by extending the
PATH - Provides a CMake API to read and write
amentresource index entries- The index is created at build time and provides efficient access to information like the available packages, messages, etc.
- Provides an uninstall target for convenience
See below for an example of using ament_cmake_gtest with colcon test. All other tests follow a similar pattern.
This example assumes that the package my_cool_pkg is generated with autoware_auto_create_package.
Writing a unit test with gtest
In my_cool_pkg/test, create the gtest entrypoint gtest_main.cpp:
Create the gtest code file test_my_cool_pkg.cpp:
For more examples of gtest features, see the gtest repo.
Add an entry under BUILD_TESTING in the CMakeLists.txt to compile the test the test code source files:
The entrypoint main calls all tests that are registered as gtest items.
To register a new gtest item, wrap the test code with the macro TEST (). TEST () is a predefined macro that helps generate the final test code, and also registers a gtest item.
gtest/gtest.h also contains predefined macros of gtest like ASSERT_TRUE(condition), ASSERT_FALSE(condition), ASSERT_EQ(val1,val2), ASSERT_STREQ(str1,str2), EXPECT_EQ(), etc. ASSERT_* will abort the test if the condition is not satisfied, while EXPECT_* will mark the test as failed but continue to next test condition. More information about gtest can be found in the gtest repo.
In the demo CMakeLists.txt, ament_add_gtest is a predefined macro in ament_cmake that helps simplify adding gtest code. Details can be viewed in ament_add_gtest.cmake.
Build test
By default, all necessary test files (ELF, CTesttestfile.cmake, etc.) are compiled by colcon:
Test files are generated under ~/workspace/build/my_cool_pkg.
Run test
To run test on a specific package, call:
- Note
- Remove
--merge-installif the package is built without--merge-install, which is equivalent to adding--isolatedtoament.py build(the legacy build tool).
The test command output contains a brief report of all the test results.
To get job-wise information of all executed tests, call:
Look in the ~/workspace/log/test_<date>/<package_name> directory for all the raw test commands, std_out, and std_err. There's also the ~/workspace/log/latest_*/ directory containing symbolic links to the most recent package-level build and test output.
To print the tests' details while the tests are being run, use the --event-handlers console_cohesion+ option to print the details directly to the console:
Coverage
Loosely described, a coverage metric is a measure of how much of the program code has been exercised (covered) during testing.
In Autoware.Auto the lcov tool (which uses gcov internally) is used to measure:
- Statement coverage
- Function coverage
- Branch coverage
lcov also collects the results and generates html to visualize the coverage information.
Coverage for the latest successful CI run on the master branch is here.
Use the commands below to generate coverage information for my_cool_pkg:
- Note
package_coverage.shprompts to deletebuild,install, andlogdirectories, if present. Answer withyto delete, or clean your build before generating the coverage report.
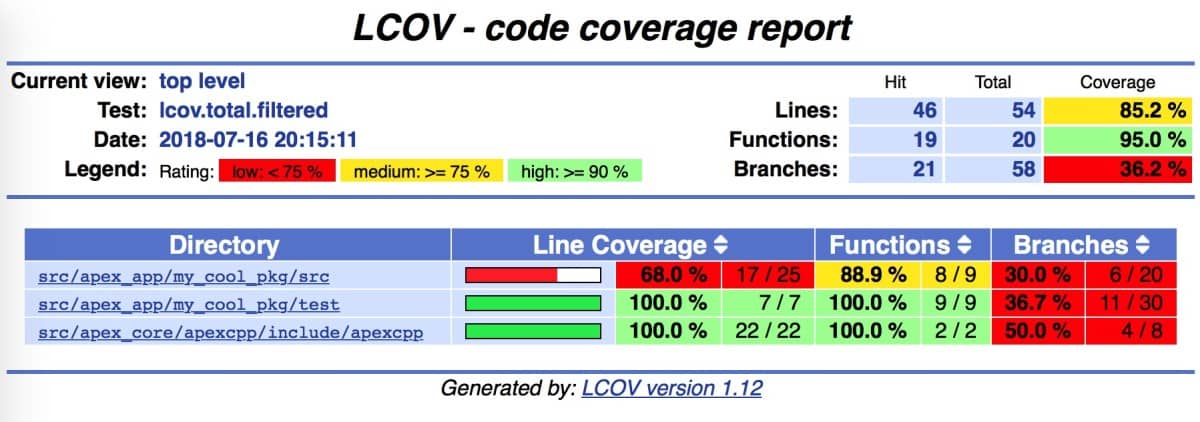
This produces the high-level coverage report and also generates a coverage folder with an index.html file in it assuming the build and tests passed successfully. The resulting lcov/index.html will have a similar form to the following:
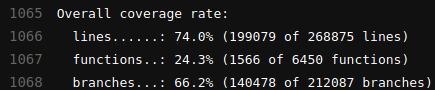
In Autoware.Auto, there is a separate "coverage" job as part of the CI pipeline that measures and reports the test coverage of a merge request:

and the summary statistics are printed near the end of the log output: