Table of Contents
Overview
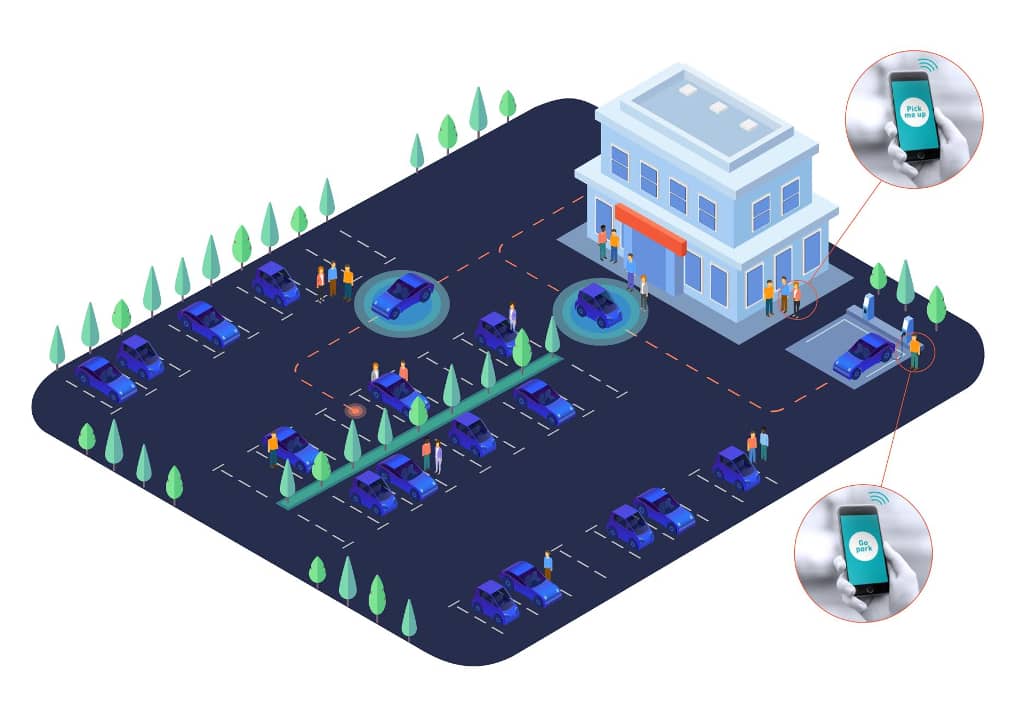
The Autonomous Valet Parking (AVP) demonstration uses Autoware.Auto to provide a valet parking service. It was realized in 2020 by Autoware members, described in more detail in this blog post.
The goal is to direct the car to autonomously park in a parking lot and to return autonomously to a pick-up/drop-off area simply by using a smartphone.
The AVP demonstration uses Autoware.Auto to provide the following functions:
- Automatically drive a car from a pre-defined drop-off zone (e.g. the entrance to a car park) to a parking spot indicated by an external system.
- Park a car in a parking spot, starting in a lane near that parking spot.
- Drive out of a parking spot.
- Drive to a pre-defined pick-up zone (e.g. the exit from a car park).
- Automatically stop for obstacles while achieving the above.
The easiest way to repeat the demonstration is to run it in Simulation. Given appropriate hardware, it can of course be repeated in real life as well as detailed in Physical demonstration.
Prerequisites
To run this demo, the following inputs are needed:
- A point-cloud map of a car park, for localization.
- An HDMap (vector map) of a car park, for navigation.
If LGSVL simulator is set up as explained, these two components should be available out of the box in simulation under /opt/AutowareAuto/share/autoware_auto_avp_demo/data.
Simulation
To run the LGSVL simulator, an NVIDIA graphics card is required. Additional information about requirements can be found here.
These instructions were tested successfully on a number of machines, these are the specs of one such machine:
- Intel(R) Core(TM) i9-9900KF CPU @ 3.60GHz (16 virtual cores) with 64GB RAM
- NVIDIA GeForce RTX 2080 with 8 GB memory
- Warning
- If the machine is overloaded by running both the simulation and the autonomous-driving stack, expect a performance degradation; see Lack of computational resources
Setup and launching
Running and controlling the simulation requires two separate terminals.
Setup
- Install ADE.
- Next open terminal 1 in ADE and follow the instructions on the LGSVL simulator page to install, configure, and run the simulator:
 $ ade enter
 ade$ /opt/lgsvl/simulator
- Warning
- If starting the simulation immediately by pressing the play button in the LGSVL web GUI, the Autoware.Auto stack will emit warnings and error messages upon launch until localization is initialized (see section below). To avoid that, do not start the simulation yet; i.e., do not press the Play button!
Launching
Open a new terminal 2, run the launch file for Milestone 3 as follows to use the pre-compiled packages from
/opt/AutowareAuto:$ ade enter ade$ source /opt/AutowareAuto/setup.bash ade$ ros2 launch autoware_auto_avp_demo ms3_sim.launch.py
Alternatively, if the source code has been modified locally, first build, then launch:
$ ade enter
ade$ cd AutowareAuto
ade$ colcon build --packages-up-to autoware_auto_avp_demo
ade$ source install/setup.bash
ade$ ros2 launch autoware_auto_avp_demo ms3_sim.launch.py
To interrupt the launched processes, hit
Ctrl c. Turning the simulation off while building can save compute resources to accelerate the build.
When following the steps above, one RViz window should pop up showing what the Autoware.Auto stack sees. The system is initially not localized, and the car is tentatively placed at the origin of the map frame. Terminal 2 displays output related to starting the stack similar to:
There should be no error messages; else check Troubleshooting.
By default, RViz is in the Move Camera mode, in which the mouse can control the view like this:
- left-click and drag to rotate
- middle-click to pan
- right-click to zoom
Change properties of how and if entities are shown in RViz from the panel on the left of the window. Hide that panel by clicking on the little triangle pointing to the left. When that panel is hidden, the output in RViz should look like this where the car is shown as a white outline:

Initializing the localization
In the LGSVL simulation, the vehicle is spawned at a particular location of the map that is different from the origin. The NDT localizer used in the Autoware.Auto stack currently requires an initial guess of the vehicle pose that is somewhere close to the truth. After that initial guess, NDT should follow along when the car moves.
Detailed instructions are given at Initializing the NDT localizer.
Driving to the drop-off zone
Now that NDT is initialized, run the simulation if it is not already running.
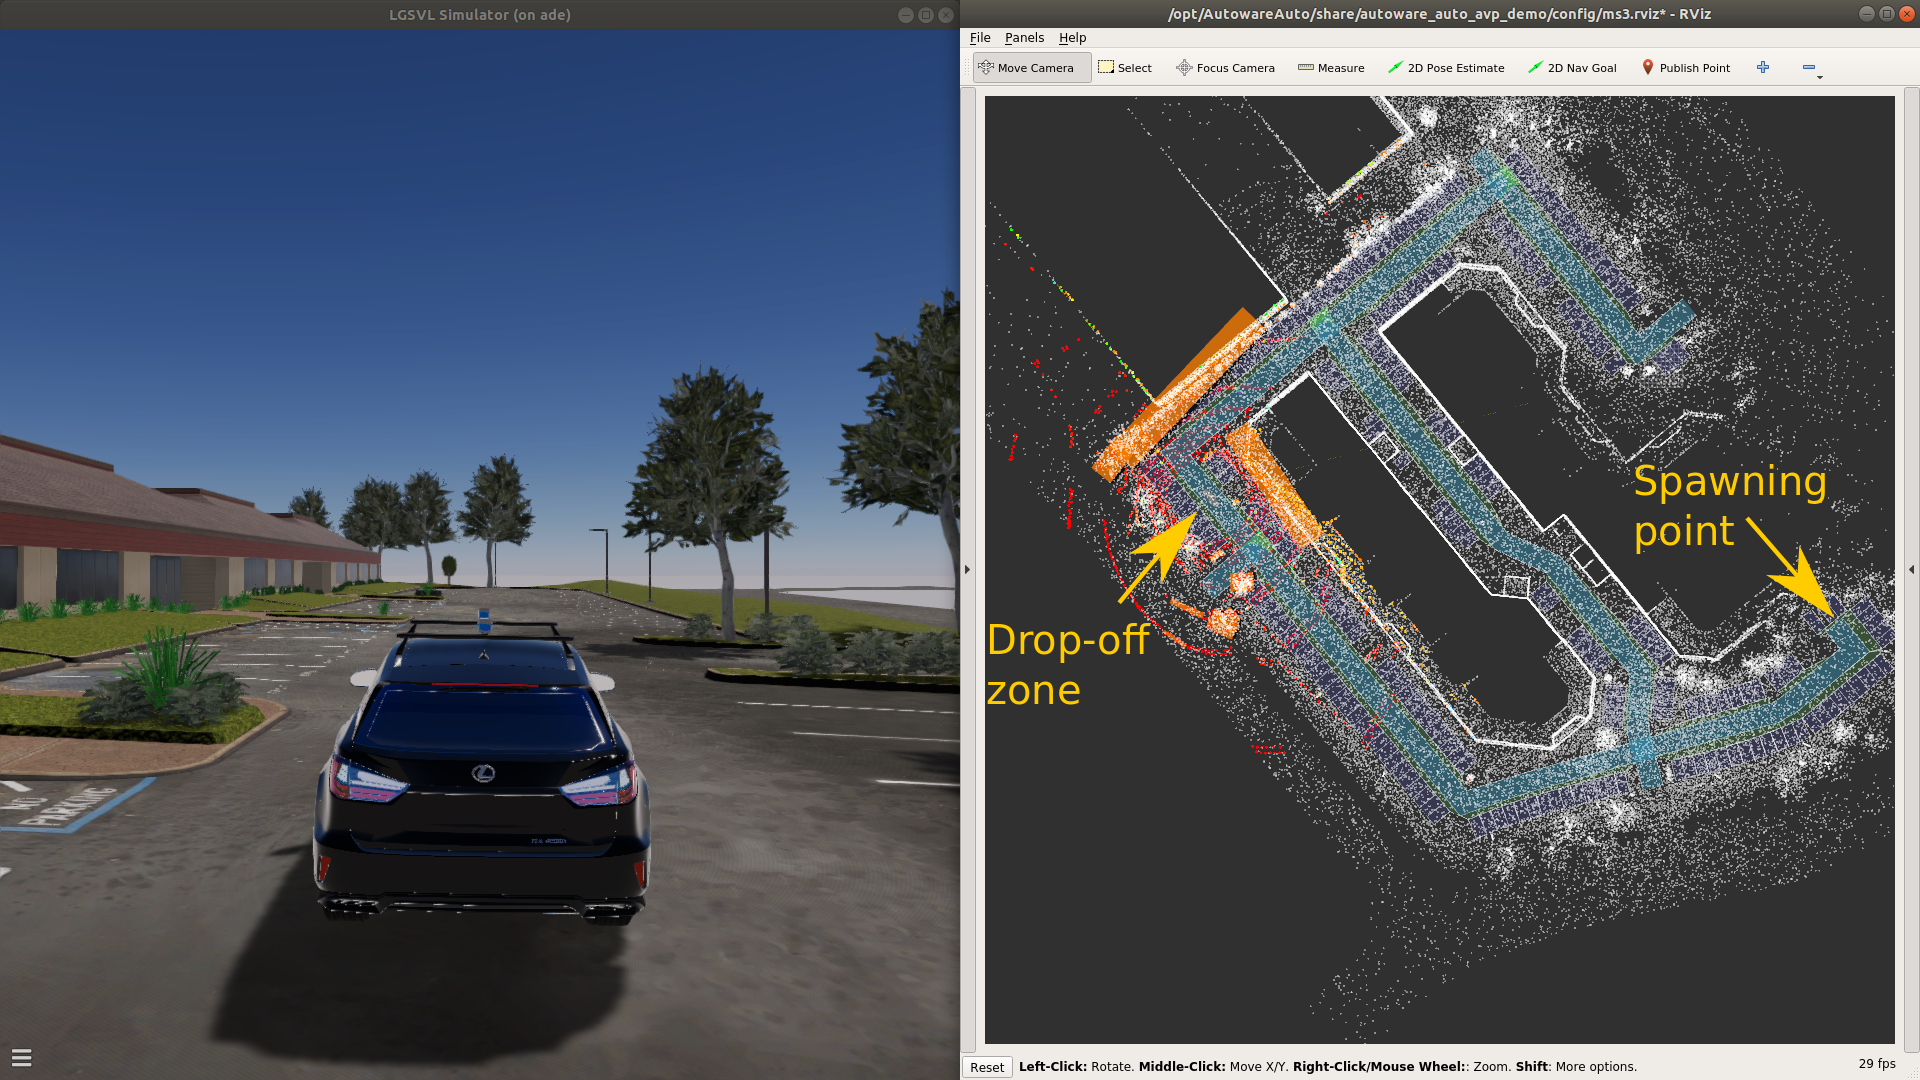
In order to reproduce the demo as in real life, manually drive the vehicle from the spawning point to the drop-off zone as shown on the image below. It may be worthwhile to spend a minute or two to drive a few laps around the map to see what is where.
In the image below, orange boxes indicate lidar objects, red points indicate lidar points that are generated as artificial input from simulation, and white dots indicate the point-cloud map used by the localization system as a reference. All of these visualization can be toggled in RViz.
Having the car in the LGSVL simulation aligned with the position in RViz as in the image below means the system is properly localized and ready for the next step.
- Note
- One can alternatively drive to the drop-off zone first, and then initialize NDT there.
Parking autonomously
In principle, the vehicle can park in any of the parking spots indicated in the map. In the physical demo, the reference parking spot was the 5th spot on the right counting from the end of the lane of the drop-off zone.

From the drop-off zone, select a parking spot by clicking the 2D Goal Pose (in ROS2 Dashing: 2D Nav Goal) button in RViz, and click and select in the map to select a parking spot and the orientation of the car, implicitly selecting among head-in and reverse parking.
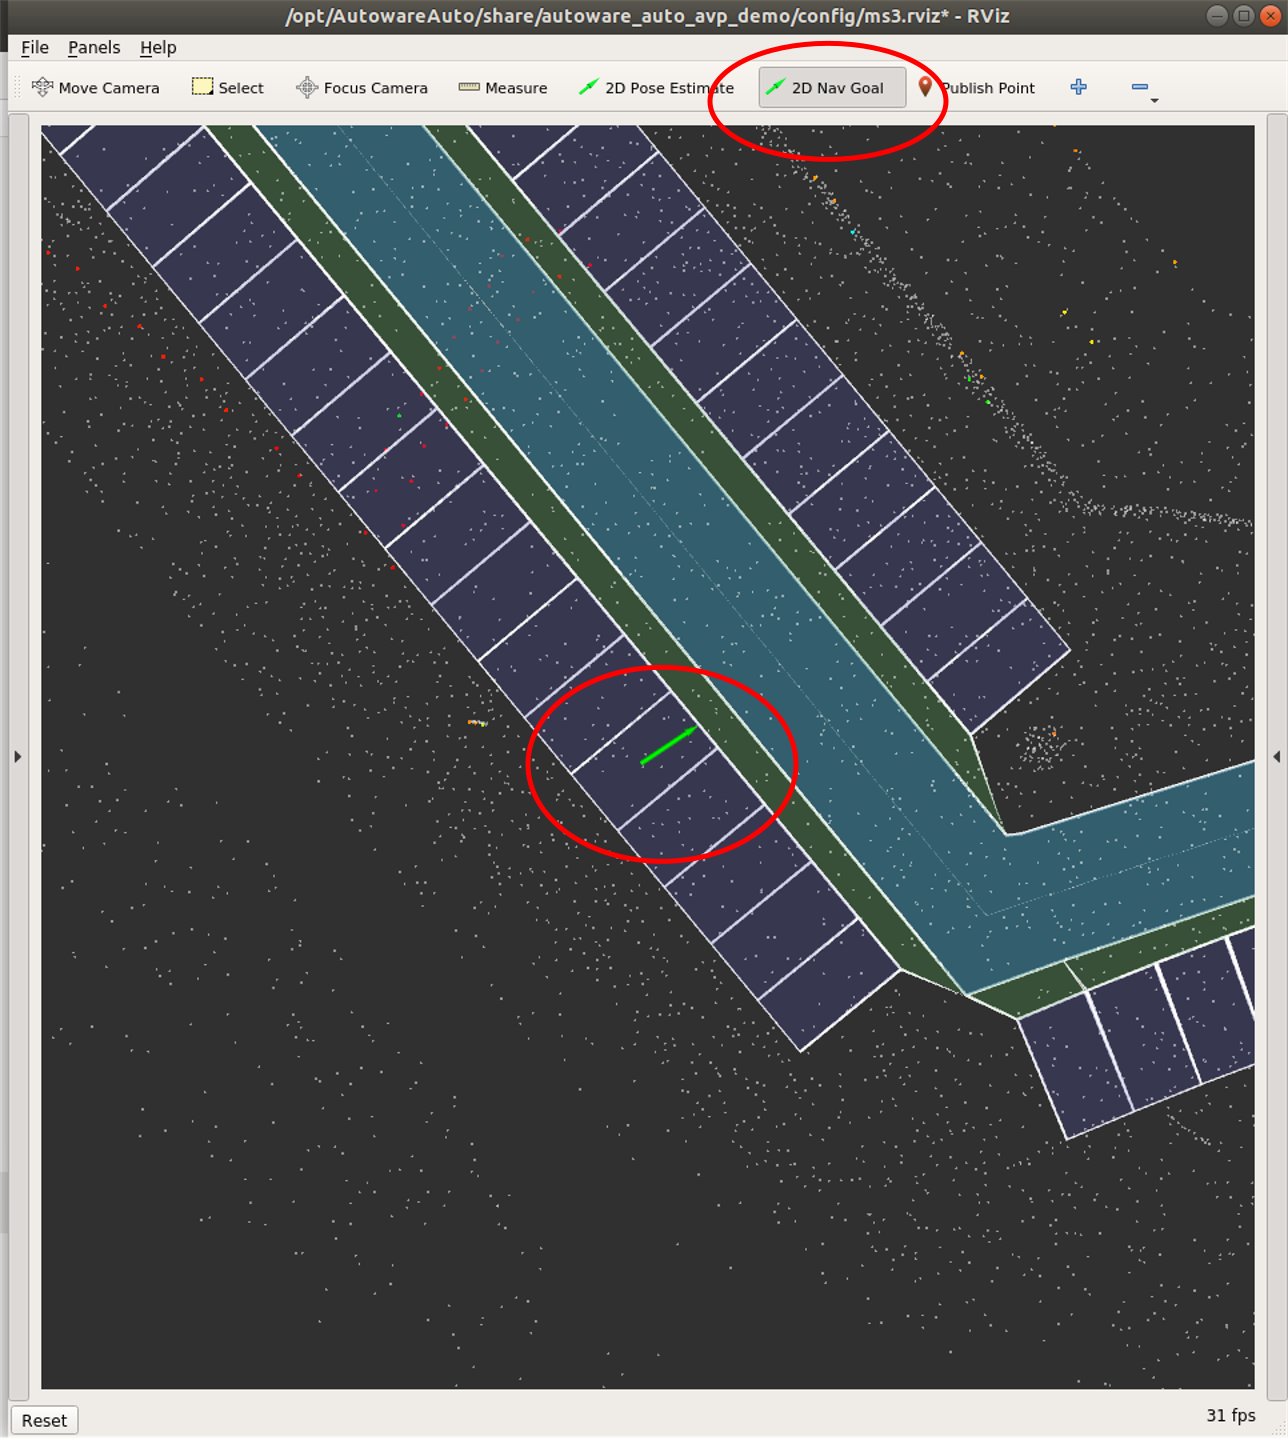
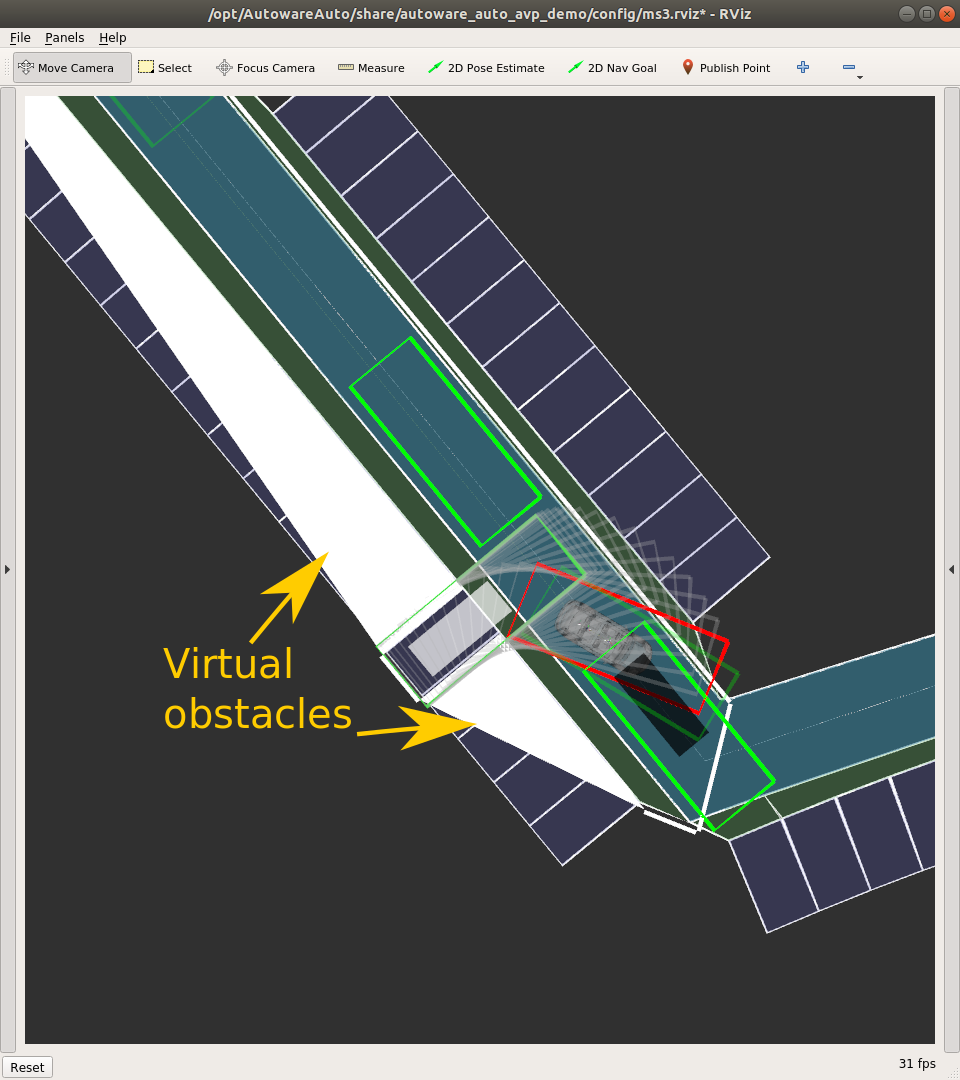
The stack then starts to plan the trajectory and visualizes poses along the way. The planning task is separated into two steps, the lane following and the parking itself. In the parking phase, virtual obstacles are added to guide the vehicle into the right position.
Further maneuvers
Once parked, the vehicle can be directed to exit the parking spot and to return to the drop-off zone following the above procedure to send a new goal pose to the planner. The poses mentioned are just examples, the vehicle can alternatively be instructed to go to another pose on an arbitrary lane in the map, or one can try parking in other parking spots.
Known limitations
- While a plan is executed, other goal poses are ignored. Either wait until the vehicle reached the target pose, or quit the stack and try again.
- Some parking spots on the map are too tight to fit the Lexus and the parking planner may fail, resulting in the vehicle not moving anymore.
- Targeting a parking spot on the same lanelet that the vehicle is currently on is not supported
- The vehicle needs to be in forward gear
- Once driven autonomously, driving manually won't work anymore because the vehicle activates the brakes to stay in previously defined target location
Controlling the vehicle through a web interface
As an alternative to selecting goal poses with a mouse in RViz, one can use a web interface that is launched with the rest of the stack.
Open http://127.0.0.1:8000/ on the host system in a web browser to send goal poses to the vehicle. This requires that
- the vehicle be manually driven to the location on the map indicated in the image above,
- the stack be initialized and localized in the map
If the above conditions are satisfied, click e.g. the Reverse park button in the web browser. In essence, this publishes a goal pose that the stack plans for. Monitor the pose coordinates with

Troubleshooting
Lack of computational resources
The computational demands of running the LGSVL simulator and the Autoware.Auto stack for the AVP demo in parallel are high and may not be met by commonly available laptops with a consumer-grade NVidia accelerator.
There are various manifestations pointing to this of lack resources:
- the localization is not able to follow the vehicle as it moves around in simulation and gets stuck at a past location,
- the localization jumps erratically while the vehicle does not move
Solution: Either run the simulation and the Autoware.Auto stack on separate machines (recommended), or run both on a more powerful computer with a better GPU.
Localization
After starting the simulation and the stack, the console is full of errors like this:
Solution: Initializing the localization
Planner failure
If the global planner cannot reach a goal pose, it outputs the following message:
Solution: This can happen is the position is too close to the vehicle as the global planner does not consider reversing and doesn't find a path within on lanelet in the map. Try a pose that is further away.
Physical demonstration
The physical AVP demonstration was performed at a car park in San Jose, CA, USA, in 2020 with a Lexus RX 450h equipped with
- the Pacmod 3.0 DBW interface,
- 2 Velodyne VLP-32Cs,
- an AutonomouStuff Spectra industrial PC,
- the AutonomouStuff Speed and Steering Control (SSC) software.
For videos of the Lexus performing the demonstration autonomously, please check Impressions from the Autonomous Valet Parking Demonstration.
Setup and launching (hardware)
Using the hardware that is defined in the Physical Demo section above, the demonstration can be run on physical hardware only in parking lots for which a Lanelet2 map and lidar map are available.
To run the demonstration on a physical vehicle using your own maps:
- Replace the paths to the
.pcdand.yamlfiles for the PCD map in thesrc/tools/autoware_auto_avp_demo/param/map_publisher_vehicle.param.yamlwith paths to your own map files. - Replace the path to the
.osmfile for the Lanelet2 map in thesrc/tools/autoware_auto_avp_demo/param/lanelet2_map_provider.param.yamlwith the path to your own map file.
Whether using your own maps or the existing ones:
- Install ADE
- In a new terminal, run the launch file for Milestone 3:
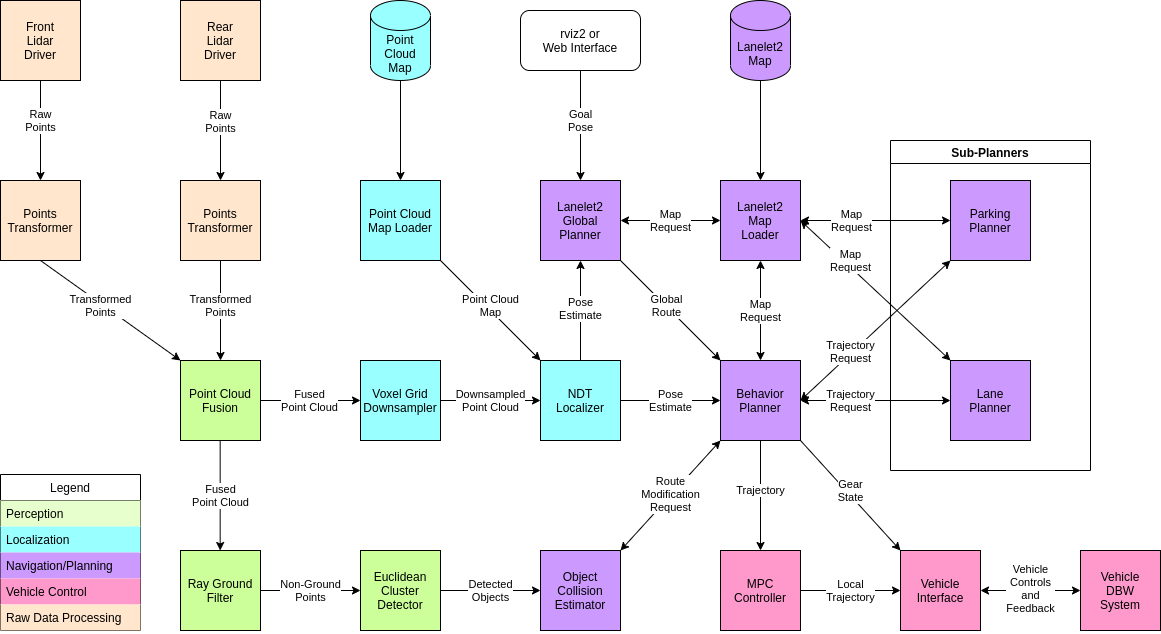
System architecture for the AVP ODD
The system architecture that was developed to address the AVP ODD in Autoware.Auto is given below: